Understanding the Picking Phase
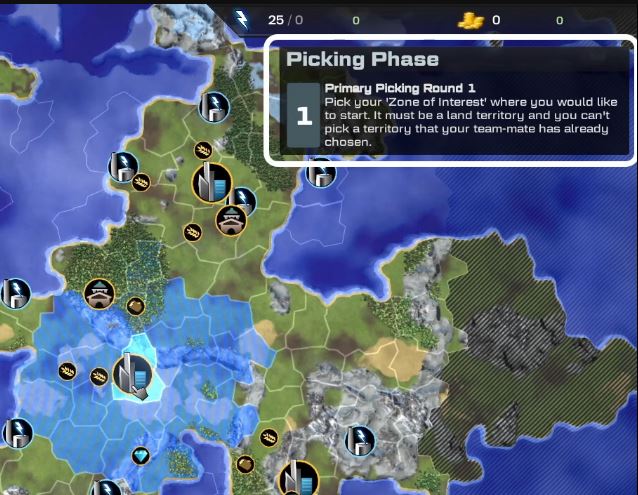
To balance the asymmetric nature of Worlds, the picking phase is crucial to the outcome of a match. This phase determines your starting position and initial strategy. You’ll find a guide on the right side of the screen to help walk you through the steps.
Step 1: Choosing Your Starting Location
Each player selects their preferred starting location. Choose strategically strong areas to either secure them for yourself or block your opponents from claiming them.
Step 2: Primary Rounds
The first few rounds are known as primary rounds, during which players claim their Zones of Interest. Your goal is to claim as many key territories as possible for yourself and your team, prioritizing geographically strong locations.
Once all teams have secured enough Zones of Interest or when no more territories remain, the final picking round begins.
Step 3: Final Picking Round
In this round, you select the specific territories where you will start the game. You can also choose up to five optional territories at a cost of 200 Capital each.
It’s generally recommended to claim as many optional territories as possible, as they generate income and provide additional starting units.
Team Coordination & Strategy
- Communicate with your teammates to avoid blocking each other.
- All selected territories must be adjacent to ones you already control and within your team’s Zone of Interest.
- Avoid starting in a corner, as opponents will have more time to grow before encountering you.
- Consider the outskirts only if central locations have been claimed or banned.
More Thoughts
At the start of the game, you have time to pick your first zone. If your opponent picks a nearby zone, both will cancel out (marked by red lines), and you must choose another starting zone. Pay attention, as a countdown timer may start at any moment, forcing you to quickly select your remaining zones. All selected zones must be directly connected. You can pick up to six starting zones, which is usually the best choice. Choosing fewer zones grants you an extra 200 Capital, but generally, a larger income and starting army give a better advantage. A stronger army allows for faster expansion and increased economy later on.
Tips for the Picking Phase
- Your first zone should be centrally located among income sources and near oil, as oil is much cheaper than solar panels.
- Avoid picking zones in corners—your opponent could trap you, limiting your expansion.
- Be cautious when selecting zones on island borders or large continents, as opponents may block you from expanding further.
- Watch the countdown timer and keep selecting zones until you reach the maximum limit.
- If a selected zone flashes, your opponent has already claimed it, meaning they are starting nearby.
- If you predict your opponent’s starting location, you can counter them, but this strategy is risky.
- You can click through a water zone to select a land zone on the other side, but it costs 4 infantry that will not be placed. Ensure the water zone has a large enough boundary for this to work.
- On land-based maps, prioritizing territory expansion is key. On water-based maps, starting near industries, villages, and cities is often a better strategy due to fewer land zones.
- Pick zones close to each other rather than in a long chain to prevent isolated zones from being easily overwhelmed by enemies.
Why are starting spots so important?
The nearest neighbor principle shows us who has a better sphere of influence on the map.
At the start of the game both players pick their starting points. From a mathematical standpoint there is a logical way to determine which starting point is better. Here is the picture of the nearest neighbor principle:
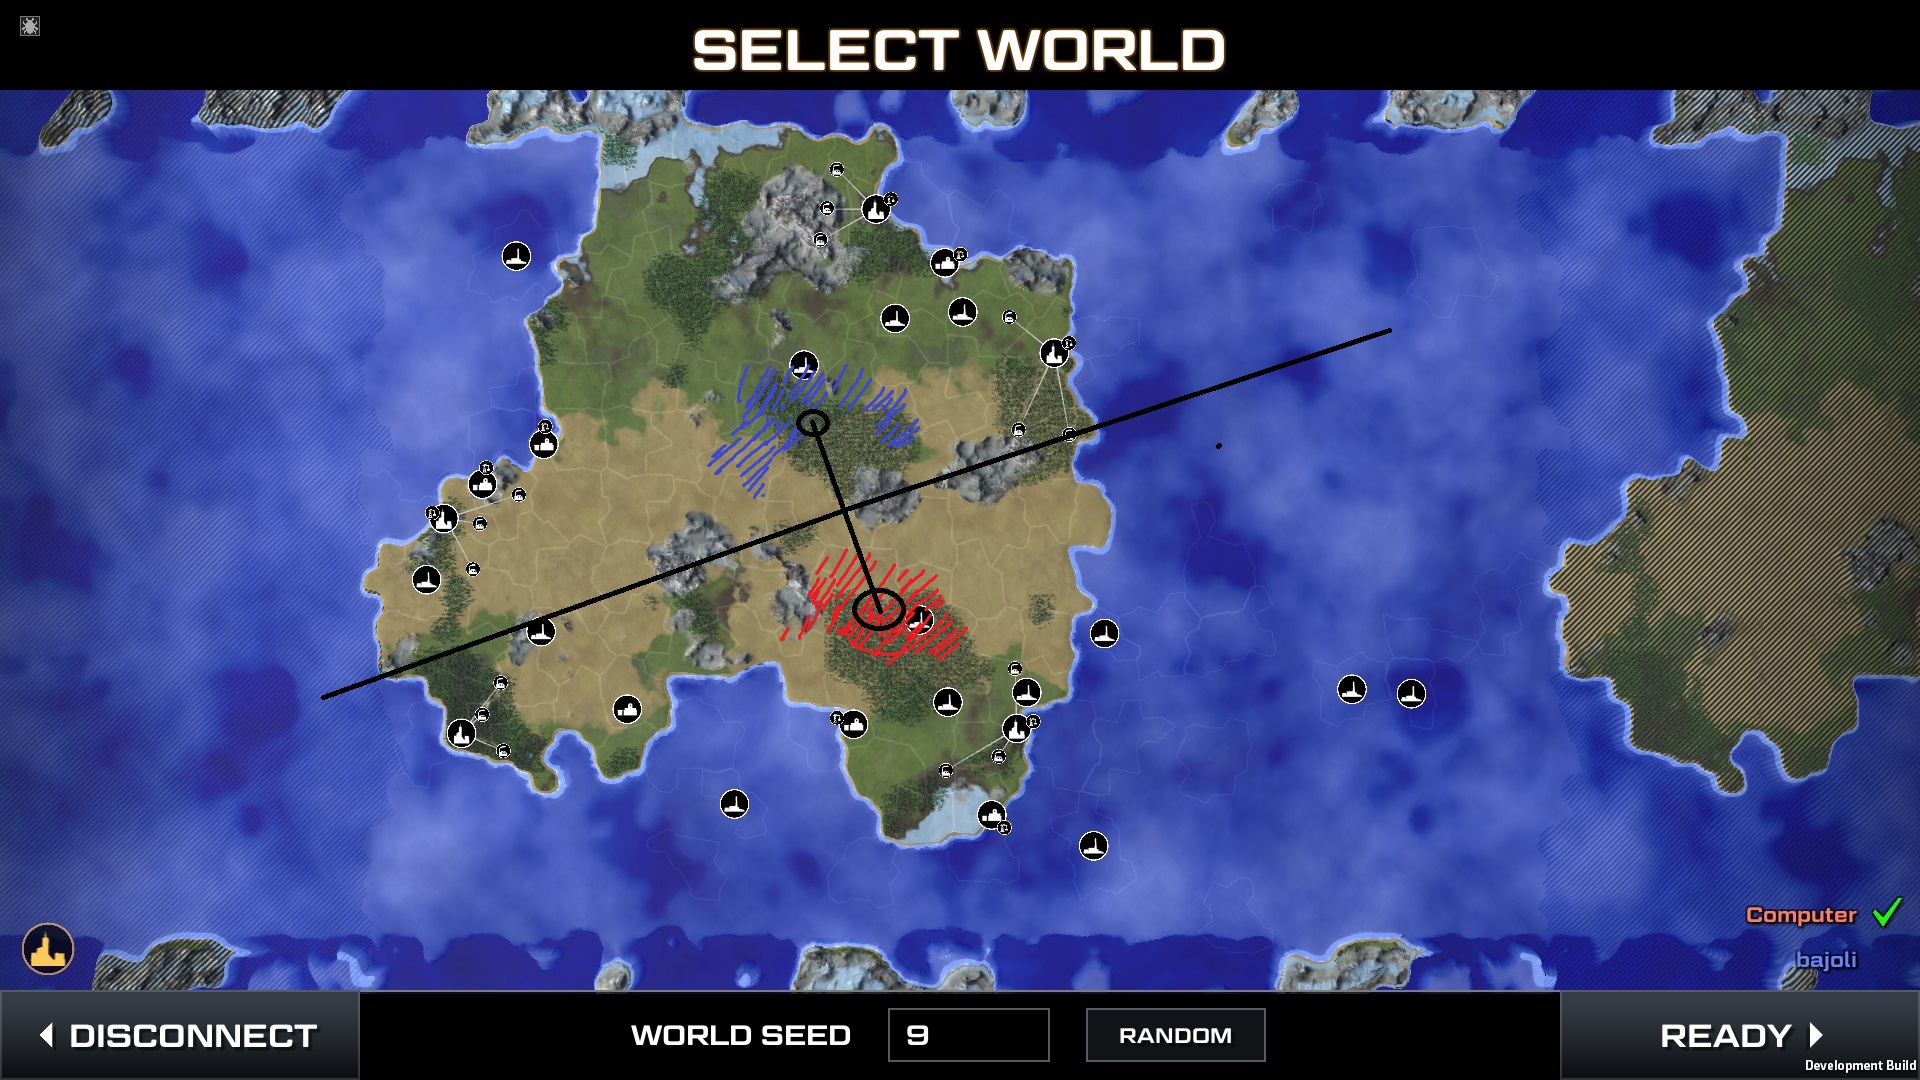
Here is an explanation of what you can do to estimate which starting point was better:
1. First you draw both starting points on the map
2. Then you estimate the middle point of the starting zones of each player
3. Then you draw line between middle points
4. Go to the middle of that line and draw a line on a 90 degree angle.
5. This line is just as far as from player 1 as from player 2.
6. Theory: by using this line you can immediately see, which player has a better starting point from a conquering perspective.
This has a large influence on who gets the best economy in mid-game, when both players conquered almost all neutral zones on the map. You can spot it from the start, but you can change the outcome by changing producer placement on the map, which shifts the balance of power.
REVISED PICKING PHASE
The Territory Picking Phase has been updated to support the new team modes. The new picking phase lets players select "Zones of Interest" where they would like to start. When there are conflicts additional rounds will let players continue to pick zones until there are enough territories for players to start in. During the final picking phase you select one or more adjacent territories that you will control when the match starts. A new picking guide UI has been introduced to guide you through the process and new tutorials will come to help you understand this better.