Under construction...
Welcome to the Line War Wiki
- ⚡ ALT + G → Ping to your enemy (1v1)
- ⚡ ALT + G → Ping to allies (Teams)
- ⚡ ALT + G + CTRL → Ping to everyone
Inspired by classic RTS titles like Command & Conquer with a nod to famed board game Axis & Allies, Line War combines elements of 4X, wargame, and real-time tactics genres into a unique strategic experience for veterans and newcomers.
Line War’s versatile control system allows players to quickly and intuitively issue commands by drawing lines across the battlefield to move units, form defensive lines, engage enemies and conquer territories. Configure your command lines to filter out certain units to flank your enemies, dig-in or feed distant frontlines.
Visual commands
Build Resources
- Refinery F2 + A
- Powerplant F2 + S
- Depot F2 + D
- Industry F2 + F
- Town F2 + G
- City F2 + H
- Port F2 + J
- Academy F2 + M
Build Producers
- Barracks F2 + Q
- Factory F2 + W
- Airport F2 + E
- Airstrip F2 + R
- Shipyard F2 + T
- Subpen F2 + Y
- Launchpad F2 + U
This game has a never-before-seen approach that lets you focus on drawing commands and executing a strategy rather than managing individual units. Chain commands and execute orchestrated operations for coordinated attacks against your opponent. This command system sets Line War apart from other strategy games.
With the exception of the offline sandbox mode where you can play around as much as you want, Line War is currently a PvP multiplayer-only RTS game. This wiki will grow over time and act as the official manual for the game.
Game Start Sequence
Learn more about the process to analyze and Select World the initial step that starts off every match.
Units
This section describes the units found in Line War, where they are produced, and their properties such as health, speed, cost, energy consumption, weapons damage, and conquering efficiency. their stealth.
The Stealth column indicates whether a unit has a stealthy profile, i.e. even where the fog-of-war has cleared the unit may remain undetected by the enemy unless they have accumulated enough sight through multiple units or through recon units.
The Recon column indicates whether a unit has increased sight which may clear the fog-of-war and if the unit contributes to the sight so that stealthy units are more easily discovered.
A unit (u) is a measurement of distance in the game. For reference, the world map is approximately 200 units wide and 140 units tall.
Land Units
| Unit | Produced By | Health |
Speed (u/sec) |
Fatigue time (sec) |
Production | Upkeep | Damage | Damage Efficiency | Conquer Efficiency | Stealth | Recon | ||||||
|---|---|---|---|---|---|---|---|---|---|---|---|---|---|---|---|---|---|
| (HP) | (HP/cap) | normal | hasted | time to 50% HP | Land | Sea | Air | Land | Sea | Air | |||||||
| Infantry | Barracks | 90 | 5.00 | 0.41 | 0.53 | 123 |
Cost: 18.0 cap Time: 36.0 s |
Cost: 1.3 cap/min Energy: 0.0 /min |
Rifle: 3.8 HP/s Range: 1.5 u |
Rifle: 2.9 HP/s Range: 1.5 u |
Rifle1: 3.0 HP/s Range: 1.8 u |
21.1% | 16.1% | 16.7%1 |
Rifle: 2.5 HP/s Efficiency: 13.9% |
No | No |
| Commando | Barracks | 80 | 2.86 | 0.46 | 0.60 | 109 |
Cost: 28.0 cap Time: 56.0 s |
Cost: 2.0 cap/min Energy: 0.0 /min |
Rifle: 6.0 HP/s Range: 1.5 u |
Rifle: 4.8 HP/s Range: 1.5 u |
Rifle1: 3.0 HP/s Range: 1.7 u |
21.4% | 17.1% | 10.7%1 |
Rifle: 4.0 HP/s Efficiency: 14.3% |
Yes | Yes |
| Artillery | Factory | 80 | 2.22 | 0.33 | 0.43 | 109 |
Cost: 36.0 cap Time: 51.4 s |
Cost: 2.5 cap/min Energy: 0.0 /min |
Grenade: 3.4 HP/s Range: 5.0 u |
Grenade: 3.0 HP/s Range: 5.0 u |
Grenade1: 3.0 HP/s Range: 1.7 u |
9.4% | 8.3% | 8.3%1 |
Grenade: 3.0 HP/s Efficiency: 8.3% |
No | No |
| Tank | Factory | 210 | 4.04 | 0.60 | 0.78 | N/A |
Cost: 52.0 cap Time: 74.3 s |
Cost: 3.6 cap/min Energy: 4.0 /min (hasted: 8.0 /min) Eff.: 9.0 (5.9) u/E |
Projectile: 7.8 HP/s Range: 1.5 u |
Projectile: 7.0 HP/s Range: 1.5 u |
Projectile1: 3.0 HP/s Range: 1.7 u |
15.0% | 13.5% | 5.8%1 |
Projectile: 6.2 HP/s Efficiency: 11.9% |
No | No |
| SAM | Factory | 100 | 2.08 | 0.33 | 0.43 | 136 |
Cost: 48.0 cap Time: 68.6 s |
Cost: 3.4 cap/min Energy: 0.0 /min |
Cannon: 3.0 HP/s Range: 2.0 u |
Cannon: 3.0 HP/s Range: 2.0 u |
Missile: 20.0 HP/hit Range: 9.0 u Rate: 1 round/4s Cannon1: 8.0 HP/s Range: 4.0 u |
6.25% | 6.25% |
10.4% 16.7%1 |
Cannon: 3.0 HP/s Efficiency: 6.25% |
No | No |
1) Except Bombers
Landunits receive a defensive bonus while entrenched in a defensive line:
This defensive bonus amounts to 30 % (so 1.43 times eff. HP) and is multiplicative to other defensive bonuses.
There is an additional defensive bonus of 40 % against grenade type damage (which is coming from ships and artillery), which amounts to a total of 58 % reduction (2.38 times eff. HP).
Furthermore, rough terrain can give additional defensive bonuses: 10 % defensive bonus in mountain terrain leading (for entrenched units in mountain terrain) to an overall 37 % damage reduction (1.59 times eff. HP) vs. non-grenade type damage and to 62.2 % reduction (2.65 times eff. HP) vs. grenade-type damage.
Riflemen (infantry and commandos) in forests get a bonus of 20 % to both their defense and firepower.
Consequently, entrenched riflemen (infantry and commandos) in forests have an overall damage reduction of 44 % (1.79 times eff. HP) vs. non-grenade dmg and on top of that 40 % more reduction against grenade-type damage, thus having an overall reduction of 66.4 % (2.98 times eff. HP).
Space Control with entrenched units:
In addition to the defensive bonuses, land units receive a range bonus of 1.0 units. Thus entrenched infantry (surface range 2.5 units) can outrange attacking SAMs (2.0 units range) and can counterattack helicopters attacking with their cannon (both now have equal range of 2.7 units). Also with 2.5 range the second row of infantry in a defensive line can directly support the front row.
Landunits receive a speed penalty in rough terrain:
This speed penalty is relatively larger for tanks than for other land units. If the territory is captured all speed penalties are reduced to one third of the original value.
| Terrain | Unit Types | When territory is: | Further Modifiers: | ||||||||||||
|---|---|---|---|---|---|---|---|---|---|---|---|---|---|---|---|
| not controlled | controlled | combat bonuses |
added stealth |
added building construction time |
|||||||||||
|
Relative Speed Penalty |
normal | hasted |
Relative Speed Penalty |
normal | hasted | ||||||||||
|
Absolute Speed |
Travel Efficiency |
Absolute Speed |
Travel Efficiency |
Absolute Speed |
Travel Efficiency |
Absolute Speed |
Travel Efficiency |
||||||||
| Plain |
Non-Tank Units |
Infantry | N/A | 0.41 u/s | N/A | 0.53 u/s | 1.5 u/HP | N/A | 0.41 u/s | N/A | 0.53 u/s | 1.5 u/HP | N/A | N/A | N/A |
| Commando | 0.46 u/s | 0.60 u/s | 1.6 u/HP | 0.46 u/s | 0.60 u/s | 1.6 u/HP | |||||||||
| Artillery | 0.33 u/s | 0.43 u/s | 1.2 u/HP | 0.33 u/s | 0.43 u/s | 1.2 u/HP | |||||||||
| SAM | |||||||||||||||
| Tank | 0.60 u/s | 9 u/E | 0.78 u/s | 5.9 u/E | 0.60 u/s | 9 u/E | 0.78 u/s | 5.9 u/E | |||||||
| Forest |
Non-Tank Units |
Infantry | 30% less | 0.29 u/s | N/A | 0.37 u/s | 1.0 u/HP | 10% less | 0.37 u/s | N/A | 0.48 u/s | 1.3 u/HP |
For riflemen (Inf and Coms) only: +20% defense and +20% attack |
very good concealment |
50% more time |
| Commando | 0.32 u/s | 0.42 u/s | 1.1 u/HP | 0.41 u/s | 0.54 u/s | 1.5 u/HP | |||||||||
| Artillery | 0.23 u/s | 0.30 u/s | 0.8 u/HP | 0.30 u/s | 0.39 u/s | 1.1 u/HP | N/A | ||||||||
| SAM | |||||||||||||||
| Tank | 40% less | 0.36 u/s | 5.4 u/E | 0.47 u/s | 3.5 u/E | 13% less | 0.52 u/s | 7.8 u/E | 0.68 u/s | 5.1 u/E | |||||
| Mountains |
Non-Tank Units |
Infantry | 50% less | 0.21 u/s | N/A | 0.27 u/s | 0.7 u/HP | 17% less | 0.34 u/s | N/A | 0.44 u/s | 1.2 u/HP |
for all land units: +10% defense |
good concealment |
50% more time |
| Commando | 0.23 u/s | 0.30 u/s | 0.8 u/HP | 0.38 u/s | 0.50 u/s | 1.4 u/HP | |||||||||
| Artillery | 0.17 u/s | 0.21 u/s | 0.6 u/HP | 0.28 u/s | 0.36 u/s | 1.0 u/HP | |||||||||
| SAM | |||||||||||||||
| Tank | 60% less | 0.24 u/s | 3.6 u/E | 0.31 u/s | 2.3 u/E | 20% less | 0.48 u/s | 7.2 u/E | 0.62 u/s | 4.7 u/E | |||||
Air Units
| Unit | Produced by | Health | Speed | Range | Production | Upkeep | Damage | Energy Eff. | Stealth | Recon | ||||||||
|---|---|---|---|---|---|---|---|---|---|---|---|---|---|---|---|---|---|---|
| total | Eff. | normal | hasted | Surface (Land and Sea) | Air | normal | hasted | |||||||||||
| (HP) | (HP/cap) | (u/sec) | (u) | Weapons | Dmg./trip | Eff. | Weapons | Dmg./trip | Eff. | u/E | ||||||||
| Helicopter | Airport | 135 | 2.25 | 1.30 | 1.69 | 45 u |
Cost: 60 cap Time: 85.7 s |
Cost: 4.2 cap/min Energy: 5.4 /min (hasted: 10.8 /min) |
Missile: 10.0 HP/hit Range: 4.5 u 4 rounds/trip Cannon: 8.0 HP/hit Range: 2.7 u 8 rounds/trip |
104 | 1.73 |
Missile: 12.0 HP/hit Range: 8.0 u 2 rounds/trip |
24 | 0.4 | 14.4 | 9.4 | No | No |
| Interceptor | Airport | 150 | 2.5 | 2.50 | 3.25 | 60 u |
Cost: 60 cap Time: 85.7 s |
Cost: 4.2 cap/min Energy: 5.4 /min (hasted: 10.8 /min) |
Cannon: 10.0 HP/hit Range: 3.5 u 6 rounds/trip u |
60 | 1.00 |
Missile: 18.0 HP/hit Range: 8.0 u 6 rounds/trip Cannon: 10.0 HP/hit Range: 3.5 u 6 rounds/trip |
168 | 2.80 | 27.8 | 18.1 | No | Yes |
| Striker | Airport | 140 | 2.33 | 2.30 | 2.99 | 60 u |
Cost: 60 cap Time: 85.7 s |
Cost: 4.2 cap/min Energy: 5.4 /min (hasted: 10.8 /min) |
Missile: 20.0 HP/hit Range: 7.5 u 4 rounds/trip Cannon: 10.0 HP/hit Range: 3.5 u 6 rounds/trip |
140 | 2.33 |
Cannon: 10.0 HP/hit Range: 3.0 6 rounds/trip u |
60 | 1.0 | 25.6 | 16.6 | No | No |
| Bomber | Airport | 145 | 1.93 |
cruise: 2.35 bomb: 1.65 |
3.06 2.14 |
75 u |
Cost: 75 cap Time: 107.1 s |
Cost: 5.3 cap/min Energy: 6.8 /min (hasted: 13.6 /min) |
Bomb: 19.0 HP/hit Range: 4.0 u 12 rounds/trip |
228 | 3.04 | N/A | 20.7 | 13.5 | No | No | ||
| Transport Jet | Airport | 135 | 2.25 | 1.70 | 2.21 | 75 u |
Cost: 60 cap Time: 85.7 s |
Cost: 4.2 cap/min Energy: 5.4 /min (hasted: 10.8 /min) |
N/A | 18.9 | 12.3 | No | No | |||||
| Rocket | Launch Pad | 230 | 0.46 | 4.00 | N/A |
Min: 20 u Max: 60 u |
Cost: 500 cap Time: 137 s |
Cost: 35 cap/min Energy: 50.0 /launch |
600 HP epicenter3 Blast Radius: 15 u |
0.4-1.2 | N/A | No4 | No | |||||
2) Against riflemen (infantry and commandos) strikers and helicopters USED TO deal 15% less damage with their missiles only. This was removed in the recent version 37.0 (AI release).
3) The epicenter delivers maximum damage. The gradient of the target projection area indicates damage fall off. The rocket is the only unit that delivers splash damage. Entrenched units facing the blast (that is, the blast is not int their 120° rear sector) take less damage.
4) Airborne rockets are easier to spot than normal units/structures
Sea Units
| Unit | Produced By | Health | Speed | Production | Upkeep | Damage | Conquer Efficiency | Energy Eff. | Stealth | Recon | |||||||||||
|---|---|---|---|---|---|---|---|---|---|---|---|---|---|---|---|---|---|---|---|---|---|
| Total | Eff. | normal | hasted | Land | Sea | Air | normal | hasted | |||||||||||||
| (HP) | (HP/cap) | (u/sec) | Weapons |
avg. (HP/s) |
Eff. | Weapons |
avg. (HP/s) |
Eff. | Weapons |
avg. (HP/s) |
Eff. | (u/E) | |||||||||
| Submarine | Subpen | 135 | 2.25 | 0.65 | 0.85 |
Cost: 60 cap Time: 85.7 s |
Cost: 4.2 cap/min Energy: 4.8 /min (hasted: 9.6 /min) |
Torpedo5: 25.0 HP/hit Range: 5.0 u Rate: 1 round/6s |
4.16 | 6.9% |
Torpedo5: 25.0 HP/hit Range: 5.0 u Rate: 1 round/6s |
4.16 | 6.9% | N/A |
Torpedo: 6.0 HP/s Efficiency: 10.0% |
8.1 | 5.3 | Yes | No | ||
| Destroyer | Shipyard | 150 | 2.5 | 0.90 | 1.17 |
Cost: 60 cap Time: 85.7 s |
Cost: 4.2 cap/min Energy: 4.8 /min (hasted: 9.6 /min) |
Grenade: 3.5 HP/s Range: 4.0 u |
3.5 | 5.8% |
Depthcharge6: 12.0 HP/hit Range: 4.0 Rate: 1 round/2s |
6.06 | 10.0%6 |
Cannon1: 5.0 HP/s Range: 2.1 u |
5.01 | 8.3%1 |
Grenade: 6.0 HP/s Efficiency: 10.0% |
11.3 | 7.3 | No | Yes |
|
Grenade: 3.5 HP/s Range: 4.0 u |
3.5 | 5.8% | |||||||||||||||||||
| Missile Ship | Shipyard | 140 | 2.33 | 0.80 | 1.04 |
Cost: 60 cap Time: 85.7 s |
Cost: 4.2 cap/min Energy: 4.8 /min (hasted: 9.6 /min) |
Grenade: 3.0 HP/s Range: 4.0 u |
3.0 | 5.0% |
Grenade: 3.0 HP/s Range: 4.0 u |
3.0 | 5.0% |
Missile: 20.0 HP/hit Range: 9.0 u Rate: 1 round/4s Cannon1: 8.0 HP/s Range: 4.0 u |
5.0 9.01 |
8.3% 13.3%1 |
Grenade: 6.0 HP/s Efficiency: 10.0% |
10.0 | 6.5 | No | No |
| Cruiser | Shipyard | 270 | 2.81 | 0.70 | 0.91 |
Cost: 96 cap Time: 137.1 s |
Cost: 6.7 cap/min Energy: 7.7 /min (hasted: 15.4 /min) |
Grenade: 6.0 HP/s Range: 5.0 u |
6.0 | 6.25% |
Grenade: 6.0 HP/s Range: 5.0 u |
6.0 | 6.25% |
Cannon1: 8.0 HP/s Range: 2.1 u |
8.01 | 8.3%1 |
Grenade: 10.0 HP/s Efficiency: 10.4% |
5.45 | 3.55 | No | No |
| Aircraft Carrier | Shipyard | 300 | 3.33 | 0.60 | 0.78 |
Cost: 90 cap Time: 128.6 s |
Cost: 6.7 cap/min Energy: 7.7 /min (hasted: 15.4 /min) |
N/A | N/A |
Cannon1: 12.0 HP/s Range: 4.0 u |
12.01 | 13.3%1 |
Cannon: 3.0 HP/s Efficiency: 3.3% |
4.68 | 3.04 | No | No | ||||
| Landing Craft | Shipyard | 110 | 2.29 | 0.80 | 1.04 |
Cost: 48 cap Time: 68.6 s |
Cost: 3.4 cap/min Energy: 3.8 /min (hasted: 7.6 /min) |
Cannon: 2.0 HP/s Range: 2.0 u |
2.0 | 4.2% |
Cannon: 2.0 HP/s Range: 2.0 u |
2.0 | 4.2% |
Cannon1: 3.0 HP/s Range: 2.0 u |
3.01 | 6.25%1 |
Cannon: 3.0 HP/s Efficiency: 6.25% |
12.6 | 8.2 | No | No |
| Merchant Ship | Port | 120 | 2.5 | 0.60 | 0.78 |
Cost: 48 cap Time: 96.0 s |
Cost: 3.4 cap/min Energy: 0.0 /min |
N/A | N/A | N/A | N/A | No | No | ||||||||
1) Except Bombers
5) Submarines can attack any sea unit, Shipyards, Subpens, Ports and Refineries at sea.
6) Destroyer's depthcharge attack can only target Submarines.
Structures
Unit Production Structures
| Building | Cost |
Health (HP) |
Build time [if terrain flat/rough] (seconds) |
Upkeep (cap/min) |
Costs from Production (cap/min on average) |
Overall Expenses (cap/min on average) |
Conquer Efficiency of Units produced |
Energy Usage of Units produced (energy/min) |
Additional Notes |
|---|---|---|---|---|---|---|---|---|---|
| Barracks | 220 | 250 | 48 / 72 | 9 | 30 | 39 | 13.9%-14.3% | 0 |
Production strength is proportional to build cost. 7 barracks cost/produce as much as 5 factories: building cost: 220 x 7 = 308 x 5 = 1540 (capital) 30 x 7 = 42 x 5 = 210 (cap/min) |
| Factory | 308 | 350 | 67 / 100.5 | 12 | 42 | 54 | 11.9%-8.3%-6.3% |
0.0-4.2 (hasted: ~8.4) |
1 Refinery (+24 E/min) can supply about: 5 to 6 unhasted Tanks (-21 to -25.2 E/min) or 2 to 3 hasted ones (-16.8 to -25.2 E/min). |
| Airport | 308 | 450 | 67 / 100.5 | 12 | 42 |
54 (75-79 when full)7 (33-37 when full and not producing)7 |
N/A |
5.4-6.8 (hasted: ~10.8-13.6) |
1 Refinery (+24 E/min) can supply about: 4 to 5 unhasted aircraft (-21.6 to 27 E/min) or 3 to 4 unhasted bombers (-20.4 to -27.2 E/min). |
| Airstrip | 200 | 320 | 48 / 72 | 8 | N/A |
8 (29-33 when full)7 |
N/A | N/A |
stealthed cannot produce units |
| Shipyard | 308 | 450 | 67 / 100.5 | 12 | 42 | 54 | 10.4%-10.0%-6.3% |
7.7-4.8-3.8 (hasted: ~15.4-9.6-7.6) |
1 Refinery (+24 E/min) can supply about: 3 unhasted cruisers/carriers (-23.1 E/min), 5 unhasted MS/destros. (-24 E/min) or 2 to 3 hasted ones (-19.2 to -28.8 E/min) and 6 unhasted transport boats or 3 hasted ones (-22.8 E/min). |
| Subpen | 308 | 350 | 67 / 101.5 | 12 | 42 | 54 | 10.0% |
4.8 (hasted: 9.6) |
stealthed 1 Refinery (+24 E/min) can supply about: 5 unhasted submarines (-24 E/min) or 2 to 3 hasted ones (-19.2 to -28.8 E/min) |
| Launchpad | 500 | 500 | 120 / 180 | 20 | 219 |
239 (55 when full)8 |
N/A | 40 per launch | stealthed |
7) a full airport/airstrip of 5 planes will cost additional 21 (25 with bombers) cap/min in Upkeep
8) a finished rocket costs 35 cap/min in Upkeep
Energy Production and Storage Structures
| Building | Cost |
Health (HP) |
Build time [if terrain flat/rough] (seconds) |
Upkeep (cap/min) |
Energy Production (E/min) |
Energy Capacity |
Additonal Notes |
|---|---|---|---|---|---|---|---|
| Refinery | 264 | 300 | 58 / 87 | 11 | 25 | 25 |
"anti-stealthed" (still stealthed when built in forests or mountains) can only be build on special locations (energy wells) |
| Power Plant | 264 | 300 | 58 / 87 | 11 | 10 | 25 | only 40% as efficient as a refinery, while same cost and upkeep |
| Depot | 152 | 300 | 48 / 72 | 6.4 | N/A | 100 | must be connected to energy production buildings via pipelines to store energy |
| Pipeline | 25 | N/A | instant | N/A | N/A | N/A |
Range: 45 u (like the range of a helicopter) Refineries and Powerplants can only have 2 pipelines connected to them. Depots can have 4 connections. |
Economy Structures
| Building | Cost |
Health (HP) |
Build time (seconds) |
Capital Production |
Territory Equivalents |
Production Efficiency |
Break-even time (minutes) |
Additonal Notes | |||||
|---|---|---|---|---|---|---|---|---|---|---|---|---|---|
| when prebuilt | flat terrain | rough terrain | (cap/min) | (1 min of prod./cost) | (cost/terr. eq.) | when prebuilt | flat terrain | rough terrain | |||||
| Industry | 150 | 200 | 0 | 60 | 90 | 22 | 2.2 | 14.67 % | 68.2 | 6.82 | 7.82 | 8.32 | After prebuilt capital is spend: eco structure with lowest break even time |
| Town | 300 | 400 | 0 | 150 | 225 | 45 | 4.5 | 15.00% | 66.7 | 6.67 | 9.17 | 10.42 |
"anti-stealthed" (still stealthed when built in forests or mountains) When build with prebuilt capital: eco structure with 2nd lowest break even time |
| Port | 250 | 300 | 0 | 120 | N/A | 38 | 3.8 | 15.20% | 65.8 | 6.58 | 8.58 | N/A |
"anti-stealthed" Most efficient eco structure (but also most risky one10) |
| Town + Port | 550 | 40010 | 0 | 270 | 345 | 83 | 8.3 | 15.09 % | 66.3 | 6.63 | 10.04 | 11.29 | When build with prebuilt capital: eco structure combination with lowest break even time (in 1v1). |
| City |
450 (+60-202.5)9 |
900 | see below |
180 (+135)9 |
270 (+202.5)9 |
120 (75 more) |
12 (7.5 more) |
14.7%/ 12.8%/ 11.5%9 |
68.0/ 78.0/ 87.09 |
8.13/9.20 | 10.80 | 13.20 |
"anti-stealthed" (still stealthed when built in forests or mountains) While the city is under construction, the former town is not producing capital. Most inefficient eco structure, but also quite hard to kill once finished. |
| City + Former Town |
750 (+0-202.5)9 |
900 |
0 (+0)9 |
330 (+135)9 |
495 (+202.5)9 |
120 | 12 |
16.0%/ 14.4%/ 12.6%9 |
62.5/ 73.8/ 79.49 |
6.25 | 11.75 | 14.50 |
A completely prebuild town plus city has even less break-even time then prebuild town plus port, but is only possible in team games and only if 0 or 1 industries belong to player with the city and all other relevant industries are prebuild by his teammate(s). |
| City + Former Town + 2 x Industry |
1050 (+20-202.5)9 |
900/200 |
20/30 (+15/22.5)9 |
330 (+135)9 |
495 (+202.5)9 |
164 | 16.4 |
15.3%/ 13.8%/ 13.1%9 |
65.2/ 72.3/ 76.49 |
6.65/6.77 | 10.70 | 12.84 |
The overall efficiency and break even time is slightly better than for the city in isolation. If a player wants to prebuild a city (usually very risky), the less industries he has to prebuild the more efficient it is. If not prebuild, the efficiency slightly increases with the number of industries. Cities on rough terrain (forest or mountains) are less efficient due to the longer buildtime, but benefit from the added stealth. For simplicity all industry sites and city are considered to be on the same terrain type (flat or rough) for the calculation of the break-even times |
| City + Former Town + 3 x Industry |
1200 (+60-202.5)9 |
900/200 |
80/120 (+60/90)9 |
330 (+135)9 |
495 (+202.5)9 |
186 | 18.6 |
14.8%/ 13.9%/ 13.3%9 |
67.7/ 71.8/ 75.49 |
7.31/7.74 | 10.35 | 12.31 | |
| City + Former Town + 4 x Industry |
1350 (+105-202.5)9 |
900/200 |
140/210 (+105/157.5)9 |
330 (+135)9 |
495 (+202.5)9 |
208 | 20.8 |
14.3%/ 14.0%/ 13.4%9 |
70.0/ 71.4/ 74.69 |
7.84/8.51 | 10.09 | 11.88 | |
| City + Former Town + 5 x Industry |
1500 (+135-202.5)9 |
900/200 | N/A |
330 (+135)9 |
495 (+202.5)9 |
230 | 23 |
14.1%/ 13.5%9 |
71.1/ 74.09 |
N/A | 9.87 | 11.54 | |
|
2 x (Town + Port) (Trade Route) |
1100 | 40010/300 | 50 | 270 | 345 | 166 | 16.6 | 15.09 % | 66.3 | 6.82 | 10.04 | 11.29 | Just the structures without the cost of merchant ships and income of the trade route |
| 192 | 120 |
96 per ship per port. ~210 for all 411 |
~12012 | ~1212 | ~60%12 | ~1612 |
~5.5 mins after ports build (~after 3 ships unloaded) |
Just the merchant ships (usually 4 needed per trade route, depending on its length) | |||||
| 1292 | ~260 | ~480 | ~555 | ~28612 | ~28.612 | ~22%12 | ~4512 | ~6.9 | ~10.3 | ~11.5 | Overall trade route. Most efficient eco "structure", but also very vulnerable. | ||
9) plus hidden costs dependent on built-time, because the former town is not producing capital. See built time rows for respective amounts of effective lost capital.
10) If the town is destroyed, then the port is destroyed as well.
11) Construction of the second set of merchant ships will be delayed during first unloading (mooring time 40 secs)
12) Estimated average value. It may vary depending on length of the trade route and jams at the ports.
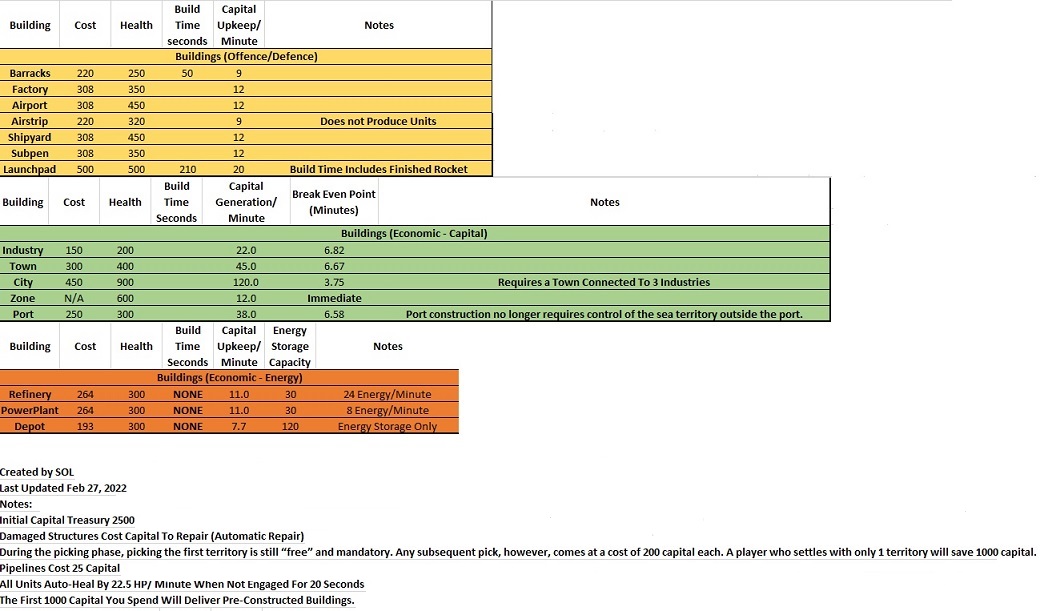
Old table for buildings (Break even times for eco structures are incorrect there):
Strategies
Longterm tip for studying the game:
Use Sandbox to test every unit under multiple conditions from tiny battles to larger battles. The reason is to find small hidden gems like: 2 infantry actually take out 1 unprotected artillery in the open field without losing a single infantry. The same is the case for infantry vs SAM.
Both situations are very profitable, but completely different stories at a larger scale ofcourse.
Another interesting thing is to test all potential starting builds against eachother on multiple types of maps.
You should usually start with 6 zones with 4 infantry in each zone. There are some exceptions on watermaps if you like to pick a water zone for either oil or clicking through towards another island.
Tips for the first minutes of the game:
1. If one of your opponent's zones are directly linked to 2 or more zones of you, without any backup nearby, make sure to attack with 8 vs 4 infantry (or better 12 vs 4).
Kill them with overwhelming force and grab the zone (-12 income for your opponent and +12 income for you as well as an advantage in infantry numbers).
If you are on the unlucky side of such exchange, make sure you don't lose your starting infantry to overwhelming force, you wil lose that specific zone anyway.
2. Immediately make your buildings in the first 10 seconds. The quicker you build them the more you will be ahead in production.
There is no way to scout and counter your opponent right now, unless you want to miss minutes of production.
3. If you don't know what to do on a land map, but you expect your opponent to be somewhat close: build 3 factories first (with 1000 instant build budget) and some barracks followed by an oil refinery ASAP. Then follow up with some tanks, maybe some defensive SAMs to defend your oil. It is hard to lose with that in the early game on land maps.
4. If you don't know what to do on water maps it is usually a good idea to make an airfield with some strikers and a shipyard with 1 troopship and missileships, unless there is a real chance your opponent started on the same large island as you, then ships may not help as much. You can choose any producer as your third building.
5. Usually don't start with tanks on water maps, they can not be shipped in troopships, unless you own a zone at the other side of the water. Sometimes an early tank-surprise on water maps can not be beaten though.
6. Always start conquering as soon as possible with your starting infantry.
7. Use your infantry for conquering zones and your other units to defend your base or to attack.
8. The most likely way to lose in the early game is against tanks or strikers if they start popping unprotected buildings. Best way to defend against both strategies is to take out your opponents oil refinery.
You can also take down the airfield with tanks and kill the strikers in the proces. You need 2 flights with a striker to kill 1 tank (tank hp: 210, striker damage per flight: 140).
And tanks build faster then strikers, so you have more of tanks than can be shot down in one flight. This means that it is hard to shoot down the tanks before they drive into the base and start shooting down buildings. Currently the sweet spot seems to be 6 tanks driving towards your opponent's base around the 2:30 minute mark.
If your opponent uses all of his infantry to defend his base, that is also perfect for you, because your infantry is still conquering zones, which will put you ahead.
9. The quickest way to demolish your opponent's oil refinery on any given map and starting distance is probably the commando airdrop instant build: 2 barracks-commando + airfield-transport-jet.
It takes 87 seconds until you are able to fly towards the goal and most often it can not be countered, because it only takes 30 seconds to shoot down the refinery with 2 commando's.
Risk: 2x30 + 60= 120 capital and potential reward: 264 and oil starvation of your opponent as well as infinite annoyance and rage quit potential.
10. Starting with too many economic buildings can be very unsafe.
11. Try to find the best spots on the map to build a second or third base. It gives more map control than having one single big base.
Tips for the mid game:
Mid-game happens around the time that both players are about to conquer the entire map. This is the moment where you should ask yourself the following questions:
1. Do i keep attacking or am i better of defending and wait while planning my next attack? There are situations inwhich attacking is just to risky and the same may be the case for your opponent.
2. Do i need to boom my economy with cities villages, harbours etc? Sometimes you can win the game right away by pushing your advantages.
Why wait and spent 2400 on 2 cities first, while you already have 500 cashflow per minute and are on the winning hand? In such case making more military buildings or a rocket can be much better.
3. Do i need a rocket? This 1000+ capital question is really important, because it can be the pathway to victory. For instance if your opponent build 5 buildings to close to each other.
In such case you should always think about using a rocket, especially if there are good second and third targets as well. Rockets are also great for cleaning up the beach before starting your landing with troopships.
4. Where would my opponent build a rocket if he was going for one? Where should you scout with an interceptor? You can do as if you build a rocket on your opponent's beach,just to look for the most optimal and safe locations for him to put his rocket as well as the range of the rocket and which places he could potentially attack.
5. Where are the weakest points in my defense right now? A good defense can be more profitable than attacking. Focus especially on SAM placements.
How to land on your opponent's side of the water in mid to late game:
1. You should own the water or at least be reasonably safe with your fleet at the spot where you want to land.
2. You should have enough troopships. The longer the distance, the more troopships you need, Somewhere between 4 and 8 should be decent.
3. You should have a large army ready to be moved.
4. You should have a lot of energy and energy income and a decent amount of capital to quickly build multiple military buildings on the other side of the water.
5. Rockets are perfect for destroying your opponent's defenses before starting your landing. Drop the rocket slightly before their army, or risk losing the rocket to AA.
6. After the rocket, follow up with your air units and push your cruisers towards the beach where you are going to land.
7. Make sure to move SAMs and missile ships to defend your landing troops and troopships.
8. Often it is a good idea to do multiple attacks on other places on the map at the same time. For instance some annoying commando drops to keep the enemy busy.
9. Watch out for counter attacks. Your opponent could try to shoot down a city with commando's while you aren't paying attention, make sure to watch the entire map.
10. The ultimate defense your opponent could use is a rocket. To shoot down your landing troops and troopships. Often it is best to land a lot of your SAMs first.
Economy Denial
If you conquer enemy territories, destroy economic structures such as cities, towns, industries and disrupt trade routes you can begin to starve your enemy of capital needed for the upkeep production of new units and construction of structures
As your enemy's economy struggles it may give you a window to grow stronger and invade